6. WebPart Communication Without Postbacks
WebPart communication is a standard portion of
ASP.NET 2.0. Out of the box, WebPart communication will require
postbacks. Now I'm not going to edit the source code of .NET and enable
the establishment of such communication without postbacks. I intend to
leverage upon the existing WebPart communication infrastructure and
allow the establishment of communication between WebParts using the
standard WebPart communication mechanisms. Thus the initial
establishment of such communication will still require a postback, but
the actual communication itself will be done using Ajax.
We have a Silverlight WebPart ready that shows me a
list of appointments and a JavaScript WebPart that, given an ID, is able
to fetch the appointment detail from SharePoint. Once these two
WebParts are connected with each other, the user should be able to
select an appointment from the Silverlight WebPart and view the details
in the JavaScript WebPart –without postbacks.
Thus it is clear that the process of selecting an
appointment and communicating it with the JavaScript WebPart has to be
done on the client side using JavaScript only. So if somehow Silverlight
could call a JavaScript method to set the value of the idToFetch in Listing 5-10 and then call the FetchAppointment method in Listing 5-10, this client-side communication would work.
Silverlight can call JavaScript methods using the
HTML Bridge, so that is not a problem. The problem however is that
Silverlight doesn't know which JavaScript method to call. This is
because there could be multiple consumers of one provider WebPart, and
as a result, there could be multiple FetchAppointment methods on the
same HTML page.
Did you note? I said multiple FetchAppointment methods.
That is not going to work because JavaScript expects unique method
names. If you're using the JavaScript client object model inside a
WebPart, you will have to write some code to generate unique method and
variable names. I haven't done that in my previous example (to keep
things to the point), but I will demonstrate that going forward while
establishing this client-side WebPart communication.
|
As a rule of thumb, if you're using the JavaScript
client object model inside a WebPart, you have to write some code to
generate unique method and variable names. Another option is to send in
an ID as a parameter.
|
|
So when Silverlight calls a JavaScript method, it
needs to know the unique ID of the consumer WebPart. This will allow
Silverlight to affect the correct WebPart on the page. Thus, as a part
of establishing WebPart communication, I will need to communicate the ID
of the WebPart. So let's start writing our WebPart communication code.
The communication contract in this case looks like this:
public interface IAppointmentDisplay
{
  void AddListener(string clientID);
}
The next step is to implement the provider. The
provider in this case will be the Silverlight WebPart that shows an
overview of the schedule. Open the ScheduleOverview.cs class in your
project and edit it as shown in Listing 11 to turn it into a provider of IAppointment display.
Example 11. ScheduleOverview.cs as a Provider
public class ScheduleOverView : WebPart, IAppointmentDisplay
{
  private string displayClientID = String.Empty;

  protected override void RenderContents(HtmlTextWriter writer)
  {
    StringBuilder sb = new StringBuilder();
    sb.AppendLine("<object style=\"display:block\" data=\"data:application/x-Silverlight-2,\"
type=\"application/x-Silverlight-2\" width=\"600px\" height=\"500px\">");
    sb.AppendLine("<param name=\"source\" value=\"/SilverlightXAP/SLScheduler.xap\" />");
    sb.AppendLine("<param name=\"onError\" value=\"onSilverlightError\" />");
    sb.AppendLine("<param name=\"initParams\" value=\"MS.SP.url=" + SPContext.Current.Site.Url
+ "\" />");
    sb.AppendLine("</object>");

    writer.Write(sb.ToString());
    base.RenderContents(writer);
  }

  public void AddListener(string clientID)
  {
    displayClientID = clientID;
  }
[ConnectionProvider("Appointment Display Provider")]
  public IAppointmentDisplay GetAppointmentDisplayCommunicationPoint()
  {
    return this as IAppointmentDisplay;
  }
}
|
As you can see from the provider code, I'm getting
the clientID of the consumer WebPart and storing it as a private member
variable. Later on, I will edit the code further to pass this clientID
to a client-side JavaScript method so that method knows which
FetchAppointment method to call. Another thing you will note is that
there could be multiple consumers and a single provider. Thus
technically you would have to maintain an array of clientIDs of all
connected consumer WebParts. I'm going to keep things simple and to the
point, and demonstrate my concept using only a single clientID. You can
extend the provided code to add support for multiple consumer WebParts
an exercise for you.
Next let's go ahead and implement the consumer
WebPart. The consumer WebPart in this scenario will be the JavaScript
WebPart that shows an individual appointment. Open the
IndividualAppointment.cs file and add the code shown in Listing 12 in the IndividualAppointment class.
Example 12. Consumer Code for the IndividualAppointment class
private IAppointmentDisplay theProvider;
private string pseudoRandomID = RandomString(4, true);

[ConnectionConsumer("Appointment Display Consumer")]
public void InitializeProvider(IAppointmentDisplay provider)
{
  theProvider = provider;
}

protected override void OnPreRender(EventArgs e)
{
  base.OnPreRender(e);
  if (theProvider != null)
  {
    theProvider.AddListener(pseudoRandomID);
  }
}

private static string RandomString(int size, bool lowerCase)
{
  StringBuilder builder = new StringBuilder();
  Random random = new Random();
  char ch;
  for (int i = 0; i < size; i++)
  {
    ch = Convert.ToChar(Convert.ToInt32(Math.Floor(26 * random.NextDouble() + 65)));
    builder.Append(ch);
  }
  if (lowerCase)
    return builder.ToString().ToLower();
  return builder.ToString();
}
|
Similar to normal consumer WebPart communication
code, I'm getting an instance to the provider and storing it as a
private member variable. In the OnPreRender method, if the provider is
not null (i.e., the provider has been connected to this consumer), I'm
calling its AddListener method and passing in a pseudoRandomID. The
pseudoRandomID is a four-character, randomly generated string. Remember
that I will need to pass this clientID to client-side JavaScript, so I
didn't want to send a long GUID or some other ugly number like that.
Now with this much code, your WebParts are
connectable. In other words, you now have the ability to pass in the
clientID from a consumer (JavaScript individual appointment WebPart) to
the provider (Silverlight schedule overview WebPart).
Now the Silverlight WebPart has enough information to
call the proper FetchAppointment JavaScript method on the client side.
However, instead of calling the FetchAppointment JavaScript method
directly, I will instead create an entry point method in my
IndividualAppointment WebPart. This will greatly simplify my Silverlight
JavaScript method. In order to achieve this, edit the RenderContents
method of the IndividualAppointment WebPart to what is shown in Listing 13.
Example 13. RenderContents Method of the IndividualAppointment WebPart
protected override void RenderContents(HtmlTextWriter writer)
{
 writer.WriteLine("<div id=\"appointmentDetails\"/>");

 StringBuilder sb = new StringBuilder();
 sb.AppendLine("<script language=\"JavaScript\">");
 sb.Append(
   @"
   function [clientID]DisplayData(appointmentID)
   {
     idToFetch = appointmentID ;
     FetchAppointment() ;
   }
   "
   );
 sb.AppendLine("</script>");
 writer.Write(sb.ToString().Replace("[clientID]", pseudoRandomID));
 base.RenderContents(writer);
}
|
I'm injecting a JavaScript method into the rendered
client-side code. The function name of this method is dynamically
generated based on the pseudoRandomID that you calculated earlier. This
same pseudoRandomID was also passed on to the provider WebPart. This way
if there are multiple consumers, the provider will be able to call the
right method of the right consumer. Technically you will have to make
all other such methods and global variables unique as well. Again, so I
can explain my code clearly, I am going to skip on those redundant
details and will leave them as an exercise for you.
Now that you have an entry point declared in your
IndividualAppointment WebPart, I need to call this entry point from the
Silverlight WebPart. The Silverlight XAP file itself can call a
JavaScript method using the HTML Bridge, but first we need to inject
that JavaScript into the rendered client side code. Thus in the
ScheduleOverview.cs file, edit the RenderContents method as shown in Listing 14.
Example 14. RenderContents Method of the ScheduleOverview WebPart
private string clientScript =
  @"function sendmessage(selectedID)
  {
    var methodName = '[clientID]' + 'DisplayData';
    eval(methodName + '(' + selectedID + ')');
  }";

protected override void RenderContents(HtmlTextWriter writer)
{
  StringBuilder sb = new StringBuilder();
  sb.AppendLine("<object style=\"display:block\" data=\"data:application/x-Silverlight-2,\"
type=\"application/x-Silverlight-2\" width=\"600px\" height=\"500px\">");
  sb.AppendLine("<param name=\"source\" value=\"/SilverlightXAP/SLScheduler.xap\" />");
  sb.AppendLine("<param name=\"onError\" value=\"onSilverlightError\" />");
  sb.AppendLine("<param name=\"initParams\" value=\"MS.SP.url=" + SPContext.Current.Site.Url +
"\" />");
  sb.AppendLine("</object>");

  // Add JavaScript;
  if (displayClientID.Length != 0)
  {
    sb.AppendLine("<script language=\"JavaScript\">");
    sb.Append(clientScript.Replace("[clientID]", displayClientID)) ;
    sb.AppendLine("</script>");
  }

  writer.Write(sb.ToString());
  base.RenderContents(writer);
}
|
I'm declaring a clientScript private variable that
holds the code for the JavaScript method. What is interesting is that I
do not know the method name until the consumer is connected to this
provider. Thus once I have a consumer, (when the displayClientID is no
longer null), I inject this JavaScript method in the rendered HTML with
the appropriate clientID replaced. Then I use some JavaScript magic to
call the appropriate method using that eval method.
This will now allow my Silverlight WebPart to call
the JavaScript WebPart on the client side. All I need to do next is to
make changes to my XAP file, so this sendmessage JavaScript method that I
added in Listing 5-14 is actually called.
The changes to the XAP file are twofold. First we
need to make some change to the UI itself, allowing the selection of an
appointment and passing it to another WebPart. Note that passing it
another WebPart simply means calling the sendmessage JavaScript method.
The changes to the XAML portion of the Silverlight XAP are shown in Listing 15.
Example 15. MainPage.xaml for the ScheduleOverview WebPart
<Grid x:Name="LayoutRoot" Background="White">
  <Grid.RowDefinitions>
    <RowDefinition Height="20"/>
    <RowDefinition Height="*"/>
  </Grid.RowDefinitions>
  <Button x:Name="showDetails" Grid.Row="0" Click="showDetails_Click" Content="Show Details
>>"/>
  <my:RadScheduler Name="schedule" ViewMode="Day" IsReadOnly="True" Grid.Row="1">
    <my:RadScheduler.DayViewDefinition>
      <my:DayViewDefinition
        DayStartTime="07:00:00" DayEndTime="19:00:00"
        TimeSlotLength="0:30:0"/>
    </my:RadScheduler.DayViewDefinition>
  </my:RadScheduler>
</Grid>
|
I've added a button to the UI. Clicking that button
calls the showDetails_click method, which simply calls the sendmessage
JavaScript method (see Listing 16).
Example 16. showDetails_Click method
private void showDetails_Click(object sender, RoutedEventArgs e)
{
  if (schedule.SelectedAppointment == null)
  {
    MessageBox.Show("You need to select an appointment below first!");
  }
  else
  {
    HtmlPage.Window.Invoke(
     "sendmessage",
     "'" + (schedule.SelectedAppointment as Appointment).UniqueId + "'");
  }
}
|
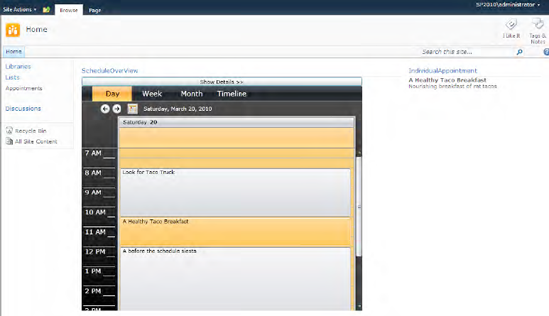
That's it. Now rebuild your solution and deploy to
SharePoint again. On a web page of your choice, drop an instance of the
Silverlight WebPart and another instance of the JavaScript WebPart. Go
ahead and establish communication between them, which leverages the
WebPart framework and will cause a postback. Then select an appointment
from the Silverlight WebPart and click the showDetails button. The
details are now shown in the JavaScript WebPart without postbacks! This
can be seen in Figure 6.
Just to drive home the point of how compelling this
really is, remember that this client side, without postback
communication that is occurring, has access to the SharePoint API using
the client object model.